How To: Job Lifecycle
The Job Lifecycle guides the user through the different states of a Job. Use the Job Lifecycle to set the standard states: Planning, Quote, Order and Completed. Although it is one complete Lifecycle the functionality of the different pages and the Create Job wizard will recognize from what context the new Job is started and set the Lifecycle state accordingly. The Lifecycle can also start an approval workflow and when completed return to either the Approved or the Rejected state.
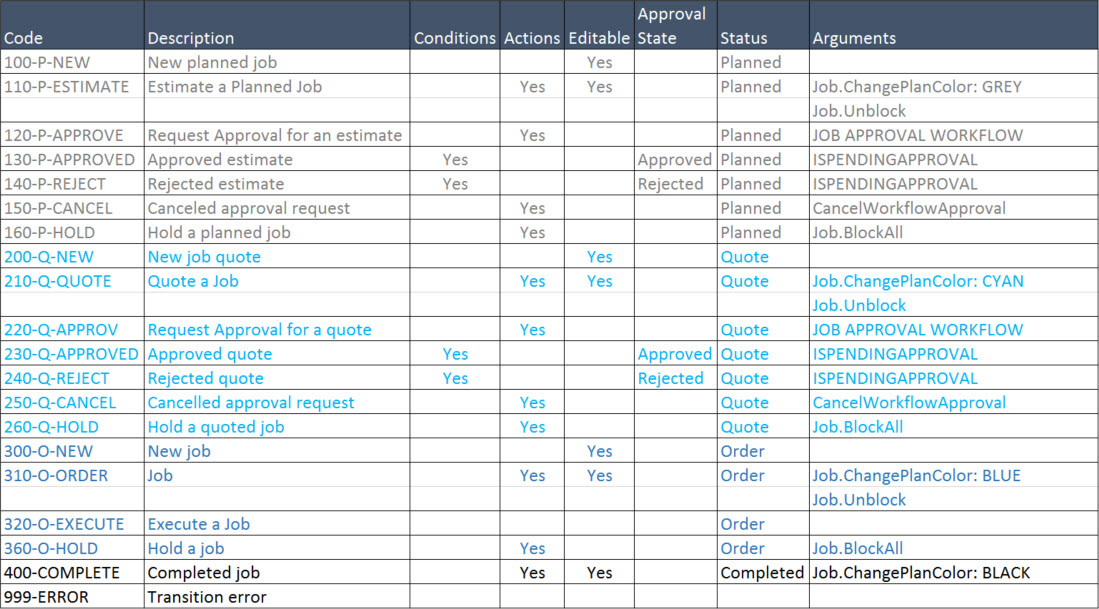
When Advanced Job Management is Enabled in the Product Registration a basic version of the Job Lifecycle will be installed. The table below shows the states from this Lifecycle. This default Job Lifecycle should be considered as a starting point which can be modified to reflect your business process.
Maintaining the Job Lifecycle
- In the Search box type Lifecycles and then select Lifecycles in Departments/Solution Center/Lifecycle Studio.
- From the Lifecycles list select the IEM-JOB Lifecyle, double click to open or select Edit from the ribbon.
- From the Lifecycle card select States from the ribbon to open the Lifecycle States.
- The default states (as installed through Product Registration) shows the following states with their conditions and action handlers:
Lifecycle States
Conditions
| State | Condition | Explanation |
|---|---|---|
| 130-P-APPROVED | Expression: ISPENDINGAPPROVAL(); Condition: false | Check if any approval requests are pending, if yes the condition is false and the state is not allowed |
| 140-P-REJECT | same | same |
| 220-Q-APPROVED | same | same |
| 220-Q-REJECT | same | same |
Action Handlers
| State | Action Handler | Explanation |
|---|---|---|
| 110-P-ESTIMATE | Job.Unblock | When the previous state was HOLD, which blocks the Job, it should be unblocked in this state |
| same | Job.ChangePlanColor | Change the plan color in the Visual Job Planner, specify the color in the Action Handler Argument |
| 210-Q-QUOTE | Job.Unblock | When the previous state was HOLD, which blocks the Job, it should be unblocked in this state |
| same | Job.ChangePlanColor | Change the plan color in the Visual Job Planner, specify the color in the Action Handler Argument |
| 310-O-ORDER | Job.Unblock | When the previous state was HOLD, which blocks the Job, it should be unblocked in this state |
| same | Job.ChangePlanColor | Change the plan color in the Visual Job Planner, specify the color in the Action Handler Argument |
| 120-P-APPROVE | SendDocForApproval | Triggers the Dynamics NAV Workflow |
| 220-Q-APPROVE | SendDocForApproval | Triggers the Dynamics NAV Workflow |
| 150-P-CANCEL | CancelWorkflowApproval | Cancels the Dynamics NAV Workflow |
| 250-Q-CANCEL | CancelWorkflowApproval | Cancels the Dynamics NAV Workflow |
| 160-P-HOLD | Job.BlockAll | Sets the Blocked option in the Job Header to All |
| 260-Q-HOLD | Job.BlockAll | Sets the Blocked option in the Job Header to All |
| 360-O-HOLD | Job.BlockAll | Sets the Blocked option in the Job Header to All |
After completing the states setup return to the Lifecycle card to review and modify the state transitions. These transitions determine the flow between the states. From each state a user can select the To code by using the Change State action from the ribbon.
Note: that on each state transition additional Conditions and Action Handlers can be set, specific to that transition
Creating the Approval Workflow
The, sample, workflow as shown below is included in the IEM delivery package and can be imported on the workflow page after completing and releasing the IEM-JOB Lifecycle as described above. When creating the Approval Workflow the following setup steps are required:
- In the Search box type Workflow and then select Workflows in Departments/Administration/Application Setup/Workflow.
- In order to be able to group the IEM specific workflows create a new Workflow Category (IEM Workflows) in the Workflow Categories list.
- Click New in the Workflow Categories list and type a Code and a Description
- Create a Workflow User Group (JOB ESTIMATE)to specify the approver for the Job Estimate.
- Click New in the Workflow User Group list to open the Workflow User Group card.
- In the Workflow User Group card type a Code and a Descriptionin the header.
- In the Workflow User Group Members select 1 or more users type and set a Sequence No. per user.
- Create a Workflow - Table Relation to link the Job table to the Approval Entry table.
- Select Workflow - Table Relations from the Administration section in Departments/Administration/Application Setup/Workflow.
- Click New in the Workflow - Table Relations list
- Type 167 in the Table ID field, the Table Caption, Job, will be retrieved automatically