How To : Base, Master and Invoice Templates
Templates are meant to make projects repeatable. When a company regularly runs the same type of projects, or projects with the same structure, that experience and knowledge can be embedded in templates. When creating a new Job or a Job Quote templates can be selected to quickly create a project structure. The following templates can be used:
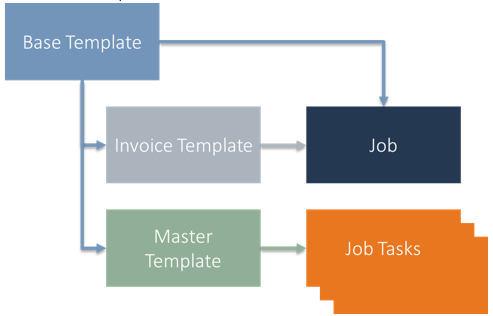
- Base Templates to define the header for the Job or the Job Quote Version. The Base Template can also hold a Master Template and an Invoice Template.
- Master Templates. To define default structures, and the budget. Linked from the Base Template (optional) or can be loaded to build the Job structure in a modular way.
- Invoice Templates. To define the invoicing method for the Job and to set different payment schedules for the fixed price method. Can be linked to the Base Template.
Besides these templates also a Surcharge Model can be selected per Job Task as a template for surcharges like Risk - and Project Management. To provide different views on the project Elements and Activities can be used to create Cost Breakdown Structures and/or Activity Breakdown Structures for the project.
Note: The use of templates as well as Elements and Activities are optional within IEM.
Base Templates
Base & Master Templates are independent from each other. The Base Template contains the base setup for a project, for example the Job Posting Group and the WIP Method. Elements and Activities are optional. You can link a Master Template to a Base Template to create a complete project at once when the Base Template is linked to project.
| Field | Value |
|---|---|
| Code | Identifies the template. |
| Description and Description 2 | Describes the base template. |
| Master Template Code | Select a master template from the list to create the Job Tasks. |
| Invoice Template Code | Select an invoice template from the list to set the invoicing method for the Job. |
| Job Posting Group | Select a Job Posting Group for the Job. |
| WIP Method | Select a method to post the Work in Process for the Job. |
| Base for WIP | Select Budget or Forecast as the basis for calculating the Job's WIP value. |
| Calculate WIP Automatically | When checked the WIP values are calculated automatically whenever usage or sales are posted to the Job. |
| Search Name | Search name for the template. |
| Job Nos. | Select a number series to be used when a Job is created based on this template. |
| Location Code | Select the location code to be used for the Job created based on this template. |
| Surcharge Model Code. | Select the Surcharge Model to be used for the Job created based on this template. |
| Force Code to Tasks | When checked the Surcharge Model Code is copied to the Job Task and overrides any Surcharge Model Codes set on the Job Tasks. |
| Apply Components | When checked the Apply Components functionality can be used on the Job Item Planning Lines which means that quantities for already planned sub-assemblies are deducted from a higher level assembly. |
| Control Supply from Job | When checked replenishment orders can only be created from the Job Planning lines. |
| Scheduling Direction | Select Forward to calculate Job Task starting - and ending dates from the Job Starting date. Select Backward to calculate Job Task starting - and ending dates from the Job Ending date. |
| Last Date modified | Shows the date when the base template was last changed. |
| Base Calendar Code | Select the Calendar Code to be used for the Job created based on this template. |
| Customized Calendar | Shows if the Base Calendar has been updated. |
Master Templates
Base & Master Templates are independent from each other. The Master Template contains the structure of the project, expressed in Tasks, Elements and Activities. Elements and Activities are optional. You can link a Master Template to a Base Template to create a complete project at once when the Base Template is linked to project.
| Field | Value |
|---|---|
| Code | Identifies the template. |
| Description and Description 2 | Describes the master template. |
| Status | Open or Release. Only Open templates can be edited and only Released templates can be inserted in a Job. When changing the state from Open to Release the Begin and End Total filters are calculated and indented. |
| Autofill Next Task | When true the master template line field Next Task No. will be filled when the template is Released. Note: All content in the Next Task No. field will be removed before new values are assigned following a simple sequential scenario. |
Load Master Template
Besides the initial creation of a Job, through selecting a Base Template, a Job Task structure can also be extended by using the Load Master Template action from the Job Task List. In the wizard make the following selections:
- Master Template Code: select the master template to insert
- Load Tasks: true
- Task Starting No.: select from which Job Task No. the selected Master Template must be inserted. New Job Task Nos. will be created starting from this No.
- Stepsize Task Nos. : select the interval between the new Job Task Nos.
- The same settings are available for Elements and Activities.
Master template lines
| Field | Value |
|---|---|
| No. | Type the Job Task No. which must be numerical and unique. |
| Next Task No. | Select the successor Job Task. Multiple Task numbers can be specified separated by a pipe indicating that after task 202 tasks 301 and 303 can start in parallel.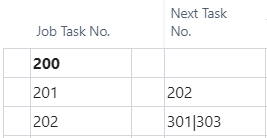 |
| Description | Type the description for the Job Task. |
| Type | Posting: Usage and sales can only be posted to Job Tasks of the type Posting. Heading: A heading for a group of Job Tasks. Total: Total is used when you want the program to total a series of Job Tasks that do not immediately precede the Total Job Task. You use Total when Job Tasks from many different Job Task groupings should be totalled. If you use the Total type, the Totalling field must not be left blank. Begin-Total: A marker for the beginning of a series of Job Tasks to be totalled that ends with an End-Total Job Task. End-Total: A total of a series of Job Tasks that starts with the preceding Begin-Total account. The total is defined in the Totalling field. |
| Invoicing Method | Select an invoicing method for the Job Task when different from the Job invoicing method. Options are: blank = same as Job, Time & Material, Fixed Price, Deliverables, No Invoicing. |
| WIP Total. | Specifies the job tasks you want to group together when calculating Work In Process (WIP) and Recognition. In any group of tasks, there needs to be one task that satisfies two conditions: 1. Has a WIP-Total that is set to Total. 2. Has a Job Task No. number that is the final one in the group or range of job tasks. If there are no job tasks with WIP-Total set to Total, Total will be set automatically on the last job task line when WIP is calculated for the first time. The field has 3 options: 1. Blank - Leave blank if the job task is a part of a group of tasks. 2. Total - Defines the range or group of tasks that are included in the WIP and recognition calculation. Within the group, any job task with Job Task Type set to Posting will be included in the WIP Total, unless its WIP-Total field is set to Excluded. 3. Excluded - Applies only to a task with Job Task Type of Posting. The task is not considered when WIP and recognition are calculated. |
| WIP Method | Contains the name of the Work in Process calculation method that is associated with a job. The value in this field comes from the WIP method specified on the job card. You cannot change the contents of this field. |
| Base for WIP | Select Budget or Forecast as the basis for the WIP calculation. |
| Totalling | Contains an interval or a list of job task numbers. The program will total the entries of the job task numbers displayed in the field to give total amounts. How the field is completed depends on which job task type you selected in the Job Task Type field: 1. If the Job Task has the type Posting, Begin-Total, or Heading, the field must be blank. 2. If the Job Task has the type End-Total, the program will automatically fill in the field when you click Actions, point to Functions, and then click Indent Job Tasks. The Job Tasks that are totaled are the ones that lie between one pair of corresponding Begin-Total and End-Total job tasks. 3. If the job task has the type Total, you must fill in the field yourself to indicate which accounts will be totaled. Important: For job tasks of the End-Total type, the Totaling field can be filled in manually. It is, however, best to let the Indent function fill in the field. |
| Element No. | Select a Job Element for the Job Task. |
| Activity No. | Select a Job Activity for the Job Task. |
| Nr. of Days | Type the quantity of working days estimated for the Job Task. This quantity will be used when calculating the Job Task starting - and ending dates. |
| Job Posting Group | Select job posting group for the Job Task when different from the Job. For each posting group you set up, you must create links to the relevant G/L accounts. |
| Surcharge Model Code | Select Surcharge Model Code for the Job Task when different from the Job. |
Master template Budget Lines
For each Job Task in the Master Template Budget Lines templates can be added as well. When inserted in the Job the current cost and pricing is retrieved. The following fields are available:
| Field | Value |
|---|---|
| Type | Resource, Item, G/L Account, Equipment. |
| No. | Select a number based on the Type |
| Item Category | For Items you can also select an Item Category and specify the number during budgeting or work preparation. |
| Group No. | For Resources you can also select a Resource Group and use this level in budgeting and planning, or breakdown the group in the budget lines or expand the group in the planning lines to individual resources. |
| Description | Defaults to the description for the No. but can be modified. |
| Duration | A date formula for the duration of the work. |
| Quantity Per | The quantity usually specified in Job but updated when the job is made customer specific. |
| Unit of Measure | Unit of measure for the quantity |
Master template Work Types
For each Job Task in the Master Template Work Types can be specified. These work types are copied to the Resource planning lines and from there to the Resource Task. A resource can only register hours for the Work Types specified. When work types are not set the resource can select any work type on the Time Sheet Line.
Invoice Templates
You can use an Invoicing Template to determine the method that is used to invoice the project to the contractor. IEM supports the following invoicing methods:
- Time & Material
- Fixed Price*
- Deliverables
- No Invoicing
*For invoicing method Fixed Price you must create an Invoicing Schedule.
Invoicing Method
| Field | Value |
|---|---|
| Code | Identifies the template. |
| Description | Describes the invoice template. |
| Status | Open or Released. Only Open templates can be edited and only Released templates can be inserted in a Job. |
| Invoicing Method | Select an invoicing method for the Job. Options are: blank = same as Job, Time & Material, Fixed Price, Deliverables, No Invoicing. |
| Base for Invoicing | Invoicing Date: As per the Invoicing Date on the Job Card - Invoicing Tab. Starting Date: As per the Starting Date on the Job Card - General Tab. Ending Date: As per the Starting Date on the Job Card - General Tab. |
| Job Posting Group | Select a Job Posting Group related to the Invoicing Method and to override the Job Posting Group on the Base Template. |
| Invoicing Schedule | Indicates if an Invoicing Schedule has been created for the Invoicing Method (which is only only possible for the method Fixed Price. |
Invoicing Schedule
| Field | Value |
|---|---|
| Description | Description of the schedule line, this description will be copied to billing line. |
| Invoicing Date Calculation Formula | This date formula will be used to extend the Base for Invoicing Date as set in the Invoicing Method. |
| Percentage | This percentage will be multiplied by the Contract Amount to calculate the invoice amount for this line. The total percentage in the schedule must add up to 100%. |